Search box customization with TypeScript
概要
以前紹介した検索ボックスの作り方を kintone UI Component の Dialog コンポーネントを使い TypeScript で実装する方法を説明します。
使用するコンポーネント
完成イメージ
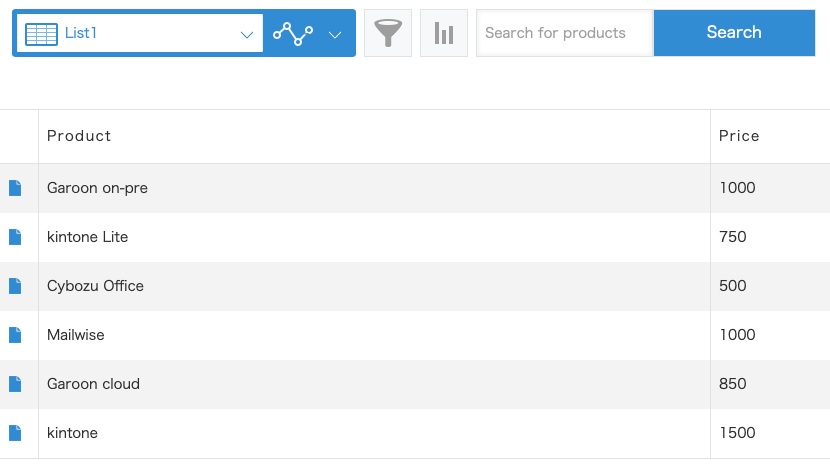
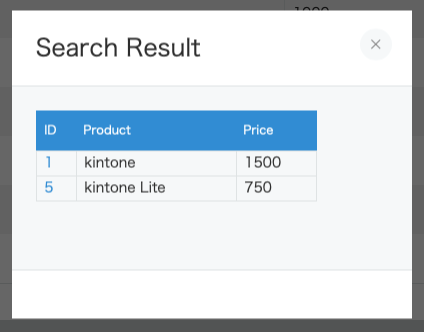
検索ボックスと検索結果ダイアログの完成イメージは、次の通りです。
検索ボックス
検索結果ダイアログ
TypeScript 環境の構築と実装
TypeScript の開発環境の構築方法は、Usage with TypeScript をご覧ください。
検索ボックスの表示
検索ボックスを表示するために、Text コンポーネントと Button コンポーネントを使います。
各コンポーネントと各コンポーネントの型定義情報をインポートします。
import { Button, Text, TextProps, ButtonProps } from "kintone-ui-component";
各コンポーネントの変数に、各コンポーネントの型定義情報を使用します。
const header = kintone.app.getHeaderMenuSpaceElement();
if (!header) return;

// Prevent duplication bug with ID granted by property
if (document.getElementById('kuc-searchbox-text') !== null) {
  return;
}

const textProps: TextProps = {
  id: 'kuc-searchbox-text',
  placeholder: 'Search for products'
};

const buttonProps: ButtonProps = {
  text: 'Search',
  id: 'kuc-searchbox-button',
  type: 'submit'
};

const text = new Text(textProps);
const button = new Button(buttonProps);
header.appendChild(text);
header.appendChild(button);
ButtonProps や TextProps にマウスをホバーすると、プロパティを参照することができます。

検索結果ダイアログの表示
以前の検索ボックスの作り方では、検索結果を表示するために、
kintone アプリの絞り込み機能の URL にクエリ文字列を埋め込んでいます。
具体的な箇所は次のコードの '&q=f6054049%20like%20"' の部分です。
この方法は推奨されない実装方法なので、今回は Dialog コンポーネントと ReadOnlyTable コンポーネントを使って検索結果を表示します。
kintone
  .api(kintone.api.url('/k/v1/records', true), 'GET', params)
  .then(resp => {
    if (resp.records.length !== 0) {
      // Process of displaying record retrieval result
      const url = '?view=' + id + '&q=f6054049%20like%20"' + keyword + '"';
      window.location.replace(url);
    }
まず、Dialog コンポーネントと型定義情報をインポートします。
今回の実装では、kintone のイベント処理を発火させる main.ts にて様々な処理を実行しています。
検索結果ダイアログは、createDialogWithTable.ts ファイルで表示しています。
Dialog コンポーネントの変数に、Dialog コンポーネントの型定義情報を使用します。
import { Dialog, DialogProps, ReadOnlyTable } from 'kintone-ui-component';

export const createDialogWithTable = (resultTable: ReadOnlyTable) => {
  const dialogProps: DialogProps = {
    title: 'Search Result',
    content: resultTable
  };
  const result = new Dialog(dialogProps);
  result.open();
};
resultTable は、api.ts ファイルで kintone REST API Client を実行した結果を、main.ts ファイルで処理して、createReadOnlyTable.ts ファイルに渡します。
export const getAllRecords = (keyword: string, appId: number) => {
  const client = new KintoneRestAPIClient();
  const body = {
    app: appId,
    condition: `product like "${keyword}" or price like "${keyword}"`
  };
  return client.record.getAllRecords<MyAppRecord>(body);
};
// API request
const apiResult = await getAllRecords(keyword, appId);

// Pick up the necessary information from the API result
const records = apiResult.map(record => {
  return {
    // url creation
    $id: `<a href=/k/${appId}/show#record=${record.$id.value}>${record.$id.value}</a>`,
    product: record.product.value,
    price: record.price.value
  };
});
export const createReadOnlyTable = (records: Record[]) => {
  const initialTableData: ReadOnlyTableProps = {
    columns: [
      {
        title: 'ID',
        field: '$id'
      },
      {
        title: 'Product',
        field: 'product'
      },
      {
        title: 'Price',
        field: 'price'
      }
    ],
    data: records,
    id: 'kuc-searchbox-readonly-table',
    visible: true,
    pagination: true,
    rowsPerPage: 5
  };

  const table = new ReadOnlyTable(initialTableData);
  return table;
};
検索ボックスと検索結果ダイアログのスタイル調整
kintone UI Component は、Custom CSS の機能を提供しています。各コンポーネントの Custom CSS のプロパティを指定することで、コンポーネントの幅や高さなどを DOM操作することなく安全に変更することできます。
今回は、Dialog コンポーネントと Text コンポーネントの CSS を調整します。
#kuc-searchbox-readonly-table {
  --kuc-readonly-table-header-0-width: 40px;
  --kuc-readonly-table-header-1-width: 160px;
  --kuc-readonly-table-header-2-width: 80px;
}

#kuc-searchbox-text {
  --kuc-text-input-height: 48px;
}
終わりに
いかがでしたでしょうか。kintone UI Component の TypeScript での実装方法、Dialog コンポーネントや Custom CSS の使い方を紹介しました。この Guides が参考になれば幸いです。
本記事は、 2024 年 2 月時点の kintone と Google Chrome で確認したものになります。
また、カスタマイズに使用した kintone UI Component のバージョンは、v1.16.0 です。