Mobile timecard customization
概要
出勤と退勤の時間を記録するモバイル版タイムカードの作り方を kintone UI Component の MobileButton コンポーネント と MobileNotification コンポーネントを使って説明します。
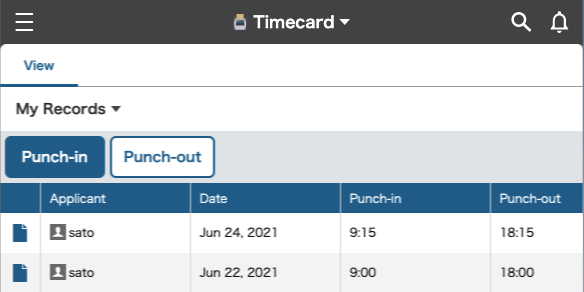
完成イメージ
以下が、画面の完成イメージです。

JavaScript/CSS カスタマイズ
kintone UI Component の UMD ファイルをアプリに読み込んだ上で、以下のような実装をした JavaScript ファイルをアップロードします。
ファイルのアップロード方法などは、Quick Start をご覧ください。
出勤(Punch-in)と退勤(Punch-out)のボタンを表示
出勤と退勤のボタンを表示するために、MobileButton コンポーネントを使います。
kintone.events.on('mobile.app.record.index.show', (event) => {

  // Prevent button duplication bug
  if (document.getElementById('kuc_punch_in_button') || document.getElementById('kuc_punch_out_button')) {
    return event;
  }

  const app = kintone.mobile.app.getId();

  // Display MobileButtons
  const header = kintone.mobile.app.getHeaderSpaceElement();
  const punchInButton = new Kuc.MobileButton({
    text: 'Punch-in',
    type: 'submit',
    id: 'kuc_punch_in_button'
  });
  const punchOutButton = new Kuc.MobileButton({
    text: 'Punch-out',
    type: 'normal',
    id: 'kuc_punch_out_button'
  });
  header.appendChild(punchInButton);
  header.appendChild(punchOutButton);
CSS を使ったボタンの間隔の調整
MobileButton コンポーネントの id プロパティに値を付与して、CSS でボタンの間隔を調整します。
@charset "UTF-8";
#kuc_punch_in_button {
  margin: 5px 5px 5px 5px;
}
#kuc_punch_out_button {
  margin: 5px 0px 5px 0px;
}
打刻する時刻の作成
出勤ボタンと退勤ボタンをクリックしたときに、次の関数を実行して現在時刻を取得します。
時刻フィールドの形式 (HH:MM) の値を作成します。
// Create time stamp
const getTime = () => {
  const time = new Date();
  const formatedTime = time.getHours() + ':' + time.getMinutes();
  return formatedTime;
};
打刻した後のリロード処理
タイムカードの打刻が終わったあと、画面を更新する処理を行っています。
// Reload function
const reload = (waitSeconds) => {
  return new Promise(resolve => {
    setTimeout(() => {
      resolve(document.location.reload());
    }, waitSeconds * 1000);
  });
};
出勤ボタンクリック時の処理
MobileButton コンポーネントは、click イベントを指定することができます。
出勤ボタンをクリックしたときに、以下のような処理を入れています。
- 当日のログインユーザーのレコード有無の判定
- レコードがある場合のメッセージ表示
// Process of punchInButton
punchInButton.addEventListener('click', async () => {
  try {
    // Check for records on the day
    const getParams = {
      app,
      query: 'date = TODAY() and creator in (LOGINUSER()) order by $id desc limit 1 offset 0'
    };
    const resp = await kintone.api(kintone.api.url('/k/v1/records', true), 'GET', getParams);

    // Display the message if there are any records on the day
    if (resp.records.length) {
      const info = new Kuc.MobileNotification({
        text: 'You have already punched-in!'
      });
      info.open();
      return;
    }
レコードの有無をチェックしたあと、以下のような処理を入れています。
- レコードがない場合、出勤時間を打刻
- 出勤時刻の打刻が完了したときのメッセージ表示
// If there is no record on the day, punch-in
if (!resp.records.length) {
  const postParams = {
    app,
    'record': {
     'start': {
        'value': getTime()
      }
    }
  };
  await kintone.api(kintone.api.url('/k/v1/record', true), 'POST', postParams);

  // Display the message when punch-in
  const info = new Kuc.MobileNotification({
      text: 'Registered a punch-in time!'
  });
  info.open();
  await reload(5);
}
退勤ボタンクリック時の処理
退勤ボタンをクリックしたときも、出勤ボタンをクリックしたときと同じように、次の処理を行なっています。
- 当日のログインユーザーのレコード有無の判定
- レコードがない場合のメッセージ表示
- レコードがある場合、退勤時間を打刻
- 退勤時刻の打刻が完了したときのメッセージ表示
※ 出勤時の処理と類似している部分が多いので、コードは省略します。
※ エラーメッセージの表示も同様の処理を行います。
エラーメッセージの表示
処理中にエラーが発生した場合、MobileNotification コンポーネントを使って、メッセージを表示しています。
} catch (error) {
  console.log(error);
  let errmsg = 'An error occurred.';
  if (error.message) {
    errmsg += ' ' + error.message;
  }
  const alert = new Kuc.MobileNotification({
    text: errmsg
  });
  alert.open();
}
本記事は、 2021 年 8 月時点の kintone と Google Chrome で確認したものになります。
また、カスタマイズに使用した kintone UI Component のバージョンは、v1.0.5 です。