Tabs customization
概要
この記事では、Tabs コンポーネントの活用とカスタマイズ方法について説明します。
以下のシナリオを想定しています。
- Tabs content に KUC コンポーネントを追加する
- Tabs content に kintone 標準フィールドを追加する
使用するコンポーネント
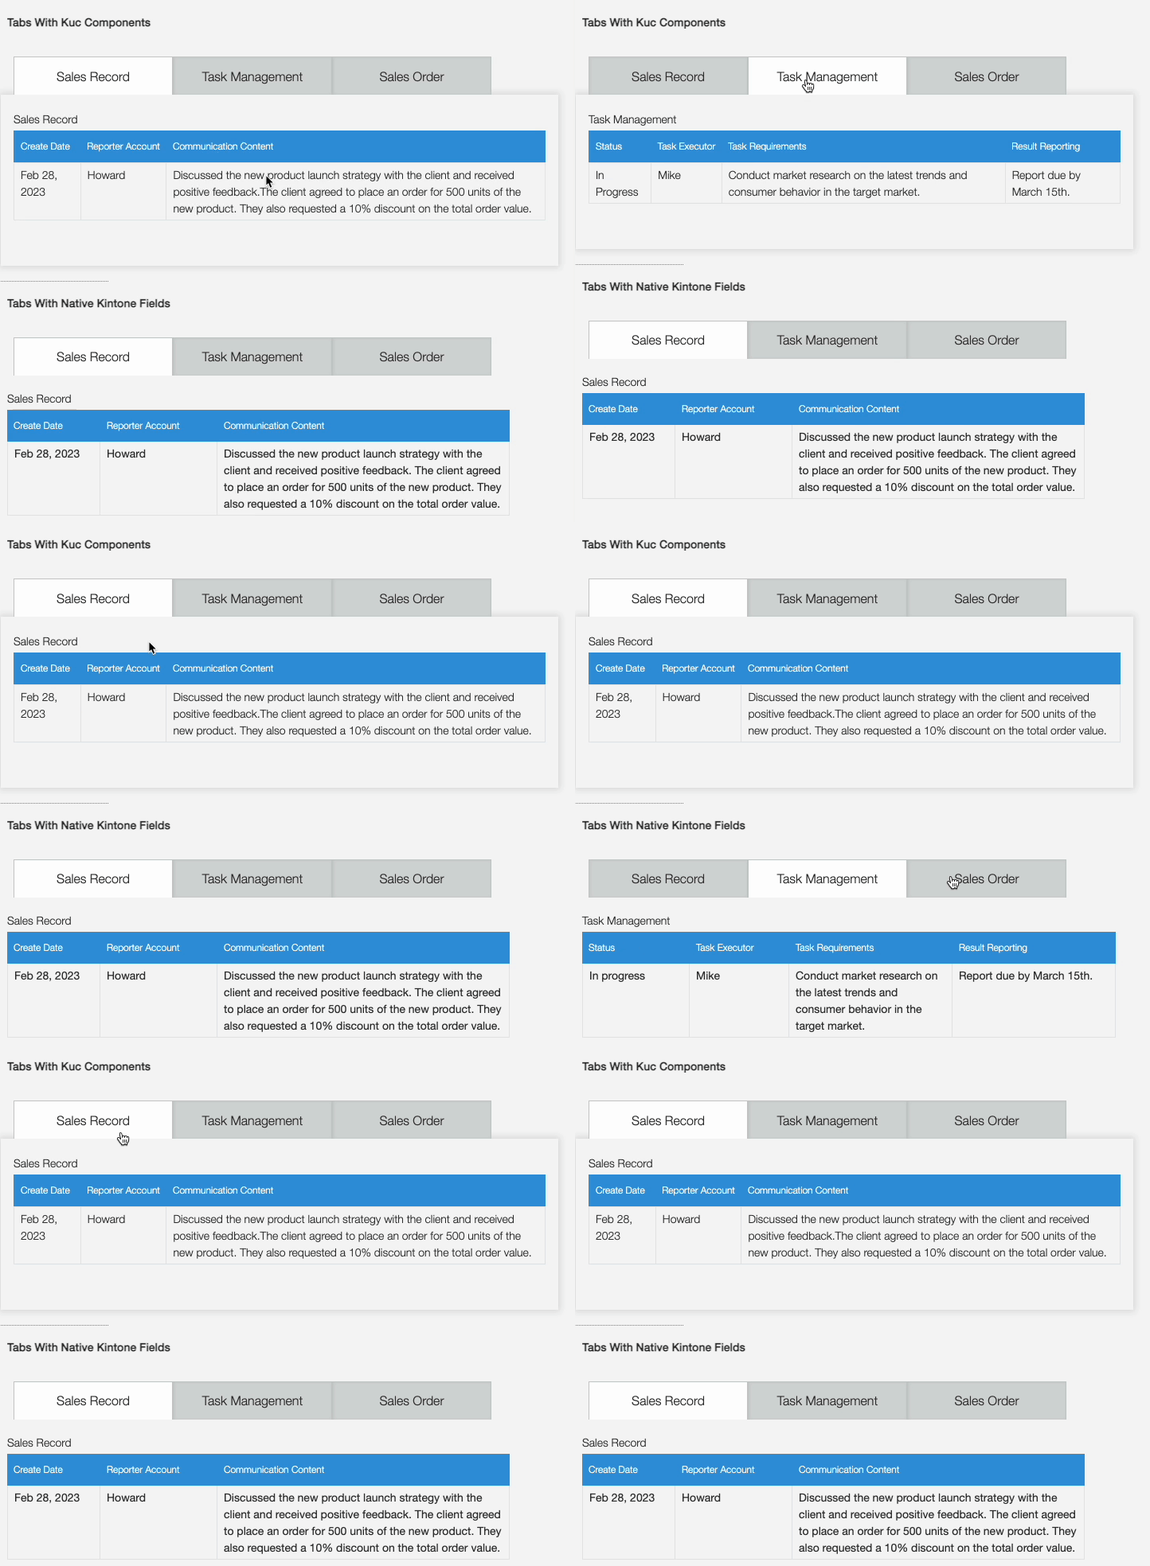
完成イメージ
以下が画面の完成イメージです。

事前準備
以下のフィールドを含むアプリを作成します。
- 2つのスペースフィールド("space_for_native_kintone" と "space_for_custom_components" という id を持つ)
- 3つのテーブルフィールド("sales_record_table", "task_management_table", "sales_order_table" という id を持つ)
JavaScript/CSS カスタマイズ
kintone UI Component の UMD ファイルをアプリに読み込んだ上で、以下のような実装をした JavaScript ファイルをアップロードします。
ファイルのアップロード方法などは、 Quick Start をご覧ください。
定数の定義
kintone UI Component のバージョン番号、スペースID、kintone フィールドなど、重要な識別子や値を参照するために定数を使用します。
const Kuc = Kucs['1.x.x'];

const SPACE_FOR_NATIVE_KINTONE = 'space_for_native_kintone';
const SPACE_FOR_CUSTOM_COMPONENTS = 'space_for_custom_components';

const SALES_RECORD_TABLE_ID = 'sales_record_table';
const TASK_MANAGEMENT_ID = 'task_management_table';
const SALES_ORDER_ID = 'sales_order_table';

// A set of Kintone fields that need to be shown/hidden on each tab.
const salesRecordTabFields = [SALES_RECORD_TABLE_ID];
const taskManagementTabFields = [TASK_MANAGEMENT_ID];
const salesOrderTabFields = [SALES_ORDER_ID];
let currentTabFields;
共通関数の作成
2つの共通関数を作成します。
- KUC Tabs を作成する
createContent関数。DOM 操作を防ぐために、isBorderVisibleオプションを作成します。isBorderVisible: falseを設定することで、DOM 操作なしで kintone 標準フィールドを Tabs content に設定することができます。 - 指定したスペースに Tabs を追加する
addTabsToDom関数。
function createTabs(contents, isBorderVisible) {
  const items = [
    {
      label: 'Sales Record',
      value: 'salesRecordTab',
      content: contents ? contents[0] : ''
    },
    {
      label: 'Task Management',
      value: 'taskManagementTab',
      content: contents ? contents[1] : ''
    },
    {
      label: 'Sales Order',
      value: 'salesOrderTab',
      content: contents ? contents[2] : ''
    }
  ];
  const tabs = new Kuc.Tabs({
    value: 'salesRecordTab',
    borderVisible: isBorderVisible,
    items
  });
  return tabs;
}

function addTabsToDOM(tabs, space_id) {
  const spaceElement = kintone.app.record.getSpaceElement(space_id);
  spaceElement.appendChild(tabs);
}
カスタムコンポーネント用の Tabs 作成
Tabs コンポーネントを使って、タブによって異なるカスタムテーブル(kintone UI Component の ReadOnlyTable コンポーネントで作成)を表示します。
タブがクリックされると、Tabs コンポーネントは自動的に対応するカスタムテーブルを表示し、残りのテーブルを非表示にします。
createContent 関数を使って、コンポーネントの配列を受け取り、それらを padding を持つコンテナに追加します。
最後に、createTabs 関数を呼び出してタブを作成し、addTabsToDOM() 関数を呼び出して指定したスペースに Tabs コンポーネントを追加します。
function initCustomComponentTabs() {
  const salesRecordTable = new Kuc.ReadOnlyTable({
    label: 'Sales Record',
    columns: [
      { title: 'Create Date', field: 'date' },
      { title: 'Reporter Account', field: 'account' },
      { title: 'Communication Content', field: 'communication' }
    ],
    data: [
      {
        date: 'Feb 28, 2023',
        account: 'Howard',
        communication:
        'Discussed the new product launch strategy with the client and received positive feedback.' +
        'The client agreed to place an order for 500 units of the new product. They also requested a 10% discount on the total order value.'
      }
    ]
  });
  const salesRecordContent = createContent([salesRecordTable]);

  const taskManagementTable = new Kuc.ReadOnlyTable({
    label: 'Task Management',
    columns: [
      { title: 'Status', field: 'status' },
      { title: 'Task Executor', field: 'executor' },
      { title: 'Task Requirements', field: 'requirements' },
      { title: 'Result Reporting', field: 'reporting' }
    ],
    data: [
      {
        status: 'In Progress',
        executor: 'Mike',
        requirements:
        'Conduct market research on the latest trends and consumer behavior in the target market.',
        reporting: 'Report due by March 15th.'
      }
    ]
  });
  const taskManagementContent = createContent([taskManagementTable]);

  const salesOrderTable = new Kuc.ReadOnlyTable({
    label: 'Sales Order',
    columns: [{ title: 'Order Number', field: 'order' }],
    data: [{ order: '1' }]
  });
  const salesOrderContent = createContent([salesOrderTable]);

  const tabs = createTabs(
    [salesRecordContent, taskManagementContent, salesOrderContent],
    true
  );
  addTabsToDOM(tabs, SPACE_FOR_CUSTOM_COMPONENTS);
}

function createContent(components) {
  const content = document.createElement('div');
  content.style.padding = '16px';
  components.map(component => content.appendChild(component));
  return content;
}
kintone 標準フィールド用の Tabs 作成
Tabs コンポーネントを使って、タブによって異なる kintone 標準フィールドを表示します。
タブがクリックされると、対応する kintone 標準フィールドを表示し、それ以外のフィールドを非表示にします。
setFieldsShown 関数では、kintone.app.record.setFieldShown() API を使ってフィールドの表示・非表示を行い、addTabsChangeEventListener 関数でクリックイベントを処理しフィールドを更新します。
また、createTabs 関数を使ってタブを作成しますが、今回は kintone 標準フィールドとの親和性を高めるため、isBorderVisible: false を設定します。
最後に、addTabsToDom 関数を呼び出して、指定されたスペースに Tabs コンポーネントを追加します。
function initNativeKintoneTabs() {
  setFieldsShown(taskManagementTabFields, false);
  setFieldsShown(salesOrderTabFields, false);
  currentTabFields = salesRecordTabFields;
  const tabs = createTabs(undefined, false);
  addTabsChangeEventListener(tabs);
  addTabsToDOM(tabs, SPACE_FOR_NATIVE_KINTONE);
}

function addTabsChangeEventListener(tabs) {
  tabs.addEventListener('change', event => {
    switch (event.detail.value) {
      case 'salesRecordTab':
        switchDisplayedFields(salesRecordTabFields);
        break;
      case 'taskManagementTab':
        switchDisplayedFields(taskManagementTabFields);
        break;
      case 'salesOrderTab':
        switchDisplayedFields(salesOrderTabFields);
        break;
    }
  });
}

function switchDisplayedFields(displayedFields) {
  setFieldsShown(displayedFields, true);
  setFieldsShown(currentTabFields, false);
  currentTabFields = displayedFields;
}

function setFieldsShown(fields, isShown) {
  fields.forEach(field => {
    kintone.app.record.setFieldShown(field, isShown);
  });
}
本記事は、 2023 年 5 月時点の kintone と Google Chrome で確認したものになります。
また、カスタマイズに使用した kintone UI Component のバージョンは、v1.11.0 です。