Attachment customization
概要
今回は、Attachment コンポーネントの活用とカスタマイズの仕方を説明します。
以下のシナリオを想定します。
- ファイルオブジェクト(Blob/ArrayBuffer, シンプルなオブジェクトパターン)を作って KUC(kintone UI Component)の Attachment コンポーネントに追加する
- ユーザーが添付したファイル情報を取得する
- ファイルの type/size を検証して不正な値の場合にエラーを表示する
- KUC Attachment コンポーネントのファイルを kintone の添付ファイルフィールドにアップロードする
使用するコンポーネント
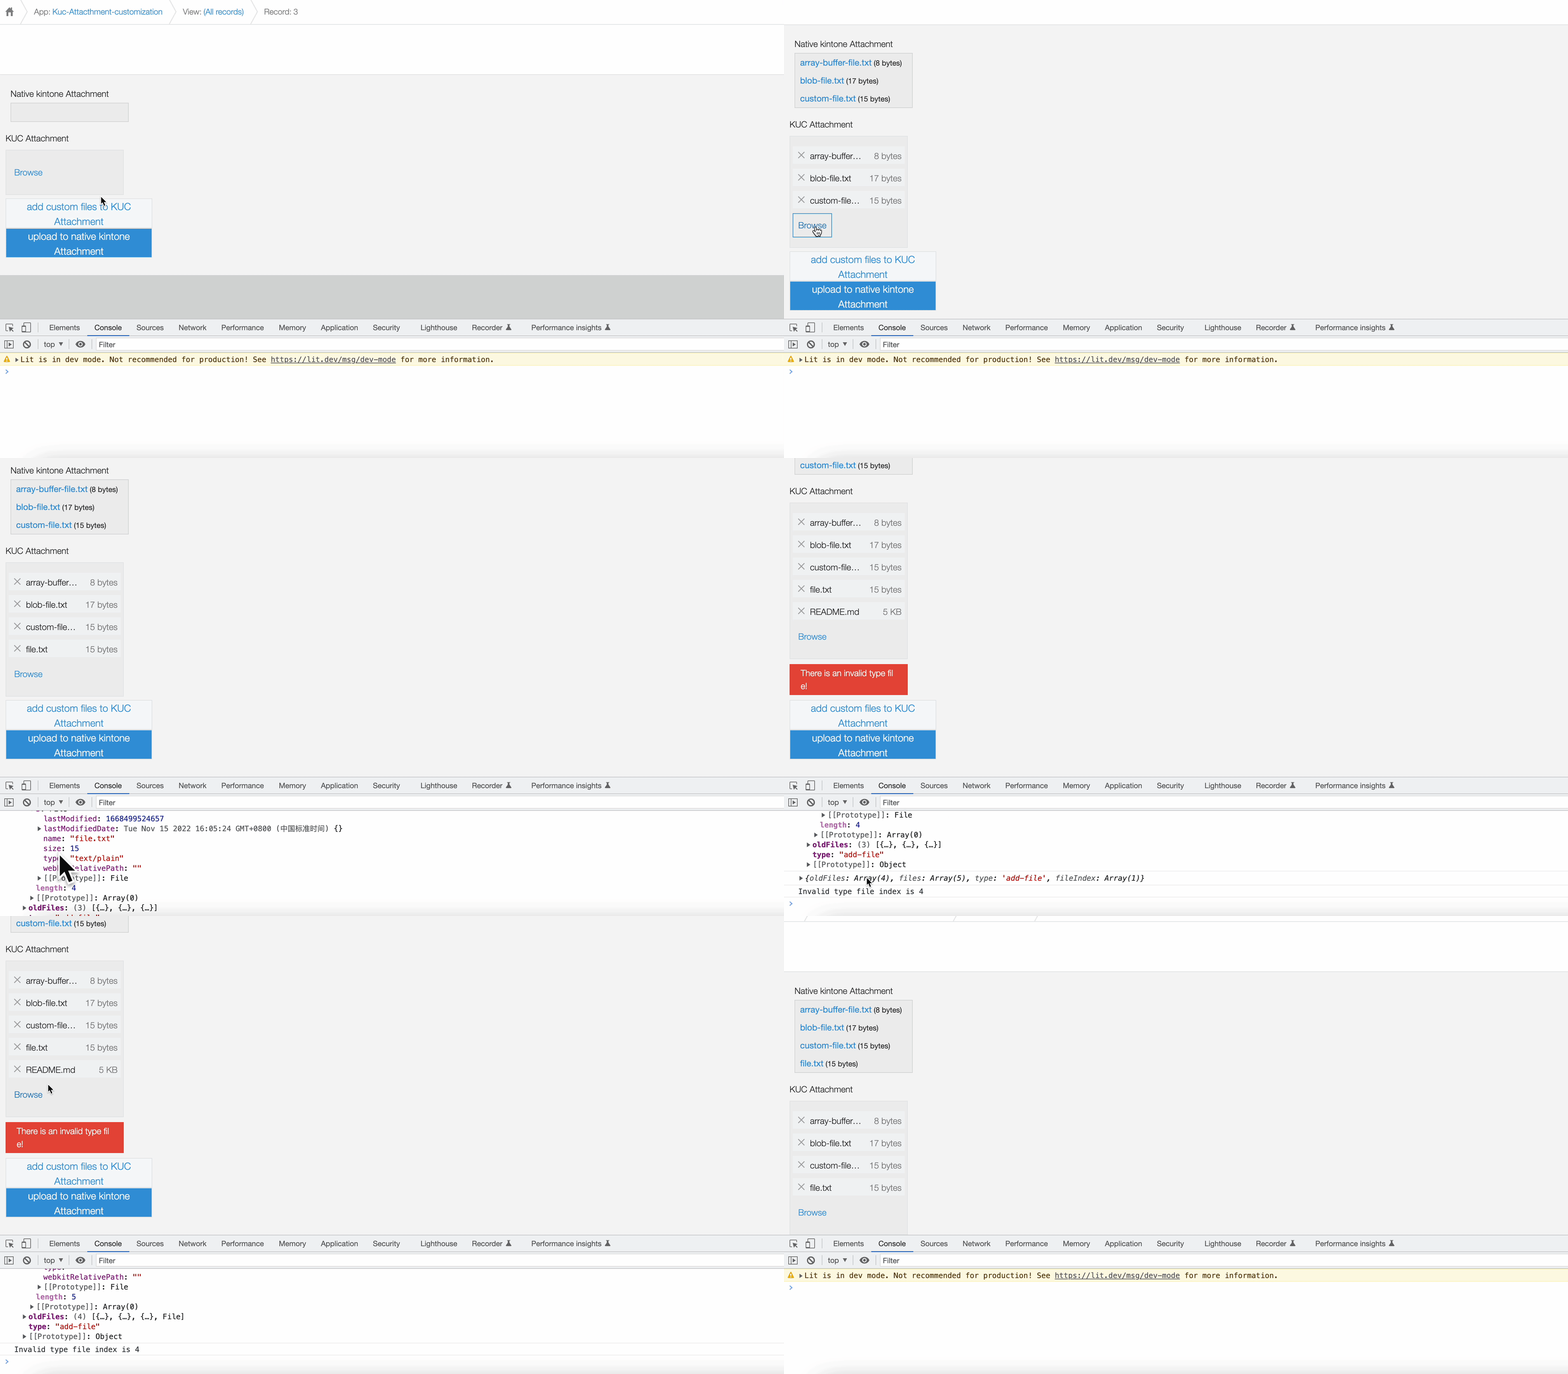
完成イメージ
以下が画面の完成イメージです。

事前準備
以下のフィールドを含むアプリを作成します。
- 添付ファイルフィールド(フィールドコード:Attachment)
- スペースフィールド(要素ID:space)
JavaScript/CSS カスタマイズ
kintone UI Component の UMD ファイルをアプリに読み込んだ上で、以下のような実装をした JavaScript ファイルをアップロードします。
ファイルのアップロード方法などは、 Quick Start をご覧ください。
カスタムの Attachment エリアの表示
KUC Attachment コンポーネントと 2つの Button コンポーネントを表示します。
- カスタムファイルを KUC Attachment に追加する
- kintone の添付ファイルフィールドにアップロードする
const KINTONE_ATTACHMENT_FIELD = 'Attachment'; // kintone attachment field ID
const SPACE_ID = 'space'; // kintone space ID
const Kuc = Kucs['1.x.x'];
kintone.events.on('app.record.detail.show', async event => {
  if (event.record[`${KINTONE_ATTACHMENT_FIELD}`]) {
    const attachment = new Kuc.Attachment({
      files: record[`${KINTONE_ATTACHMENT_FIELD}`].value,
      label: 'KUC Attachment'
    });
    const addCustomFilesButton = new Kuc.Button({
      text: 'add custom files to KUC Attachment'
    });
    const uploadButton = new Kuc.Button({
      text: 'upload to native kintone Attachment',
      type: 'submit'
    });
    const spinner = new Kuc.Spinner();
    const spaceElement = kintone.app.record.getSpaceElement(SPACE_ID);
    const container = document.createElement('div');
    container.appendChild(attachment);
    container.appendChild(addCustomFilesButton);
    container.appendChild(uploadButton);
    spaceElement.appendChild(container);
  }
  return event;
});
ファイルオブジェクトの作成と KUC Attachment コンポーネントへの適用
addCustomFilesButton に click イベントリスナーを追加します。
ボタンがクリックされた時、以下の 3つの種類のファイルオブジェクトが生成されます。
- File object に変換された Blob/ArrayBuffer ファイル
- シンプルなオブジェクト(
{name: "xx", size: "xx"}) そして、それらを KUC Attachment コンポーネントのfilesプロパティに追加します。
const addCustomFilesButton = new Kuc.Button({
  text: 'add custom files to KUC Attachment'
});
addCustomFilesButton.addEventListener('click', () => {
  attachment.files = attachment.files.concat(initCustomFiles());
});
function initCustomFiles() {
  const blob = new Blob(['this type is blob'], { type: 'text' });
  const buffer = new ArrayBuffer(8);
  const customFiles = [
    arrayBufferToFile(buffer, 'array-buffer-file.txt', 'text'),
    blobToFile(blob, 'blob-file.txt'),
    { name: 'custom-file.txt', size: '150', type: 'text' }
  ];
  return customFiles;
}

function arrayBufferToFile(buffer, filename, type) {
  const blob = new Blob([buffer], { type: type });
  return new File([blob], filename, { type: type });
}

function blobToFile(blob, filename) {
  return new File([blob], filename, { type: blob.type });
}
ユーザーが添付したファイル情報の取得と type/size の検証
attachment に change イベントリスナーを追加します。
いずれかのファイルを選択もしくは削除した場合、change イベントのコールバックでファイル情報を取得することができます。
ファイルの type/size(text/50MB)を検証して、不正なファイルの配列番号を取得します。
attachment.addEventListener('change', event => {
  console.log(event.detail); // The changed file info
  attachment.error = validateAttachmentFiles(event.detail.files);
});
function validateAttachmentFiles(files) {
  const acceptType = 'text';
  const maxSize = 1024 * 1024 * 50; // 50Mb
  let error = '';
  let typeErrorCount = 0;
  let sizeErrorCount = 0;
  files.forEach((file, index) => {
    let types = [];
    if (file.type) {
      types = file.type.split('/');
    }
    // The file type in the native kintone attachment field file is "contentType"
    if (file.contentType) {
      types = file.contentType.split('/');
    }
    if (!types.includes(acceptType)) {
      typeErrorCount++;
      console.log(`Invalid type file index is ${index}`);
    }
    if (!file.size || parseInt(file.size, 10) > maxSize) {
      sizeErrorCount++;
      console.log(`Invalid size file index is ${index}`);
    }
  });
  if (typeErrorCount > 0) {
    error = `There ${
      typeErrorCount === 1
        ? 'is an invalid type file'
        : 'are ' + typeErrorCount + ' invalid type files'
    }!`;
  }
  if (sizeErrorCount > 0) {
    error = `There ${
      sizeErrorCount === 1
        ? 'is an invalid size file'
        : 'are ' + sizeErrorCount + ' invalid size files'
    }!`;
  }
  return error;
}
KUC Attachment コンポーネントのファイルを kintone 添付ファイルフィールドに適用
uploadButton に click イベントリスナーを追加します。
ボタンがクリックされた時、KUC の Spinner コンポーネントを表示します。
KintoneRestApiClient の uploadFile メソッドを使って kintone にファイルをアップロードします。
upload メソッドから返された fileKeys を使って kintone のレコードを更新します。
最後に、KUC Spinner コンポーネントを閉じてページを更新します。
全ての API コールは XMLHttpRequest もしくは kintone REST API を使っています。
const KINTONE_ATTACHMENT_FIELD = 'Attachment'; // kintone attachment field ID
const ID = '$id';
const uploadButton = new Kuc.Button({
  text: 'upload to native kintone Attachment',
  type: 'submit'
});
uploadButton.addEventListener('click', async () => {
  spinner.open();
  const fileKeys = await uploadFiles(attachment.files);
  const params = generateRecordParams(fileKeys, record[`${ID}`].value);
  await updateRecord(params);
  spinner.close();
  location.reload();
});

function generateRecordParams(fileKeys, recordId) {
  const app = kintone.app.getId();
  const record = {};
  record[`${KINTONE_ATTACHMENT_FIELD}`] = { value: fileKeys };
  return { app: app, id: recordId, record: record };
}

async function uploadFiles(files) {
  const fileKeys = [];
  for (const file of files) {
    if (!file.fileKey) {
      const response = await uploadFile(file);
      file.fileKey = response.fileKey;
    }
    fileKeys.push({ fileKey: file.fileKey });
  }
  return fileKeys;
}

function uploadFile(file) {
  return new Promise((resolve, reject) => {
    const formData = new FormData();
    const blob = new Blob([file], { type: file.type ?? '' });
    formData.append('__REQUEST_TOKEN__', kintone.getRequestToken());
    formData.append('file', blob, file.name);
    const url = 'https://{domain}//k/v1/file.json';
    const xhr = new XMLHttpRequest();
    xhr.open('POST', url);
    xhr.setRequestHeader('X-Requested-With', 'XMLHttpRequest');
    xhr.onload = () => {
      if (xhr.status === 200) {
        // success
        resolve(JSON.parse(xhr.responseText));
      } else {
        // error
        reject(JSON.parse(xhr.responseText));
      }
    };
    xhr.send(formData);
  });
}

function updateRecord(params) {
  return kintone.api(
    kintone.api.url('/k/v1/record.json', true),
    'PUT',
    params
  );
}
本記事は、 2023 年 2 月時点の kintone と Google Chrome で確認したものになります。
また、カスタマイズに使用した kintone UI Component のバージョンは、v1.9.0 です。